
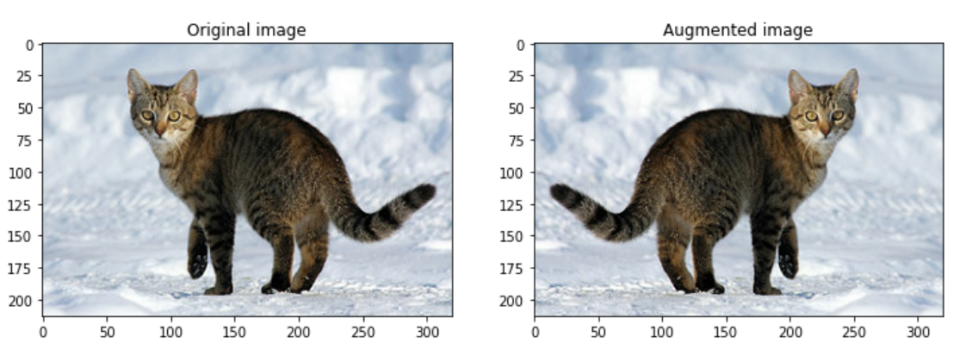
augmentation
- 갖고 있는 데이터셋을 여러 가지 방법으로 증강시켜 실질적인 학습 데이터셋의 규모를 키우는 방법
- 딥러닝 및 컴퓨터 비전 작업에서 훈련된 모델의 품질을 높이기 위해 사용됨.
- 하드디스크에 저장된 이미지 데이터를 메모리에 로드한 후, 학습시킬 때 변형을 가하는 방법을 사용함.
- augmentation을 통해서 실제 입력값과 비슷한 데이터 분포를 만들어 낼 수 있음.
- augmentation에서는 배열을 이미지의 기본 형태로 사용함.
- augmentation의 기법으로는 Flipping, Gray scale, Saturation, Brightness, Rotation, Center Crop,
Random Crop, Mirroring, Color Shifting 등이 있음.
- GAN을 augmentation에 활용할 수도 있음. 전통적인 색상 변환 대신 '스타일 트랜스퍼 (style transfer)' 모델을 적용해 볼 수도 있음.
TensorFlow 라이브러리
Flipping
- 좌우 또는 상하로 이미지를 대칭 및 반전시키는 방법
- 물체 탐지(detection), 세그멘테이션(segmentation) 등에서는 라벨도 같이 대칭 및 반전을 해줘야 함.
- flip_left_right(좌우 반전)과 flip_up_down(상하 반전) 두 가지 종류가 있음.
flip_lr_tensor = tf.image.flip_left_right(image_tensor)
flip_ud_tensor = tf.image.flip_up_down(image_tensor)
Gray scale
- 3가지 채널(channel)을 가진 RGB 이미지를 하나의 채널을 갖도록 해줌.
- RGB 각각의 채널마다 가중치(weight)를 주어 가중합(weighted sum)을 함.
grayscaled = tf.image.rgb_to_grayscale(image)

Saturation
- RGB 이미지를 HSV( Hue(색조), Saturation(채도), Value(명도) )의 3가지 성분으로 색을 표현하고, saturation(채도) 채널에 offset을 적용하여 좀더 이미지를 선명하게 만들어 줌.
saturated = tf.image.adjust_saturation( image, 3 )

Brightness
- RGB 채널에서 값을 더해주면 밝아지고, 값을 빼면 어두워지는 성질을 이용하여 밝기를 변화시킴.
random_bright_tensor = tf.image.random_brightness( image_tensor, max_delta=128 )
random_bright_tensor = tf.clip_by_value( random_bright_tensor, 0, 255 )

Rotation
- 이미지의 각도를 변환해줌.
rotated = tf.image.rot90( image )

Center Crop
- 이미지 중앙을 기준으로 확대하여 자른 이미지를 사용함.
- 확대하더라도 원래의 형상을 유지해야 함.
- central_fraction은 얼마나 확대할지를 조절하는 매개변수임.
- central_fraction이 1.0인 경우는 원본 이미지와 같음.
- central_fraction의 범위는 랜덤하게 조절되도록 해야함.
def random_central_crop( image_tensor, range=(0, 1) ):
central_fraction = tf.random.uniform([1], minval=range[0], maxval=range[1], dtype=tf.float32)
cropped_tensor = tf.image.central_crop( image_tensor, central_fraction )
return cropped_tensor
plt.figure(figsize=(12, 15))

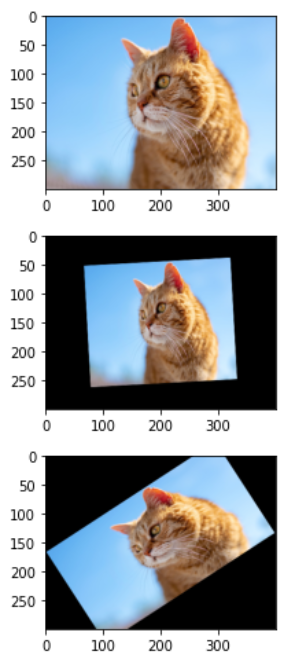
albumentations 라이브러리
- augmentation만을 모아서 제공하는 전문 라이브러리
아핀 변환 (Affine transform)
- 이미지 스케일(scale)조절, 평행이동, 회전 등의 변환을 줌.
import albumentations as A
transform = A.Compose([
A.Affine(rotate=(-45, 45),scale=(0.5,0.9),p=0.5)
])
Random Crop
transform = A.Compose(
[A.RandomCrop(width=256, height=256)]
)

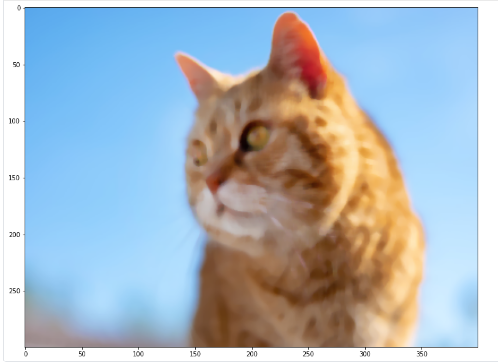
MedianBlur
transform = A.Compose(
[A.MedianBlur( blur_limit=7, always_apply=False, p=0.5 )]
)
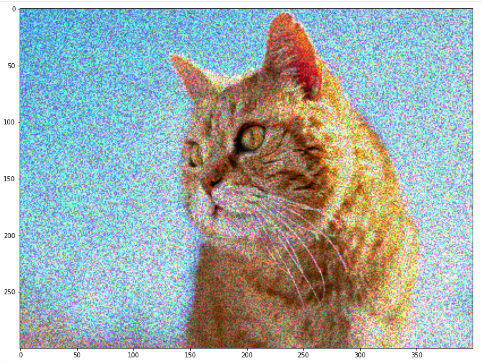
ToGray와 MultiplicativeNoise
transform = A.Compose(
[A.ToGray(p=1),
A.MultiplicativeNoise( multiplier=[0.5, 1.5], elementwise=True, per_channel=True, p=1 )]
)
텐서플로우 Random Augmentation API
- random_brightness()
- random_contrast()
- random_crop()
- random_flip_left_right()
- random_flip_up_down()
- random_hue()
- random_jpeg_quality()
- random_saturation()
test-time augmentation
- 여러 결과를 조합하기 위한 앙상블 방법 중 하나로서, 테스트 데이터셋에 augmentation을 적용함.
- 증강된 이미지를 여러번 보여준 다음, 각각의 단계에 대해서 예측값을 평균하고, 이 결과를 최종값으로 사용함.
def normalize_and_resize_img( image, label ):
image = tf.image.resize( image, [224, 224] )
return tf.cast( image, tf.float32 ) / 255., label
def augment( image,label ):
image = tf.image.random_flip_left_right( image )
image = tf.image.random_brightness( image, max_delta=0.2 )
image = tf.clip_by_value( image, 0, 1 )
return image, label
# with_aug매개변수를 통해 augmentation의 적용여부를 결정함.
def apply_normalize_on_dataset( ds, is_test = False, batch_size = 16, with_aug = False ):
ds = ds.map(
normalize_and_resize_img,
num_parallel_calls=2
)
if not is_test and with_aug:
ds = ds.map(
augment,
num_parallel_calls=2
)
ds = ds.batch(batch_size)
if not is_test:
ds = ds.repeat()
ds = ds.shuffle(200)
ds = ds.prefetch( tf.data.experimental.AUTOTUNE )
return ds
def augment2( image, label ):
image = tf.image.central_crop( image, np.random.uniform(0.50, 1.00) )
image = tf.image.resize( image, [224, 224] )
return image, label
# include_top은 마지막 fully connected layer를 포함할지 여부임.
num_classes = ds_info.features["label"].num_classes
resnet50 = keras.models.Sequential([
keras.applications.resnet.ResNet50(
include_top=False,
weights='imagenet',
input_shape=(224, 224, 3),
pooling='avg',
),
keras.layers.Dense( num_classes, activation='softmax' )
])
# Augmentation을 적용한 데이터셋으로 학습시킬 ResNet
aug_resnet50 = keras.models.Sequential([
keras.applications.resnet.ResNet50(
include_top=False,
weights='imagenet',
input_shape=(224, 224, 3),
pooling='avg',
),
keras.layers.Dense(num_classes, activation='softmax')
])
(ds_train, ds_test), ds_info = tfds.load(
'stanford_dogs',
split=['train', 'test'],
as_supervised=True,
shuffle_files=True,
with_info=True,
)
ds_train_no_aug = apply_normalize_on_dataset( ds_train, with_aug=False )
ds_train_aug = apply_normalize_on_dataset( ds_train, with_aug=True )
ds_test = apply_normalize_on_dataset( ds_test, is_test=True )
EPOCH = 3
resnet50.compile(
loss='sparse_categorical_crossentropy',
optimizer=tf.keras.optimizers.SGD(lr=0.01),
metrics=['accuracy'],
)
history_resnet50_no_aug = resnet50.fit(
ds_train_no_aug, # augmentation 적용하지 않은 데이터셋 사용
steps_per_epoch = int( ds_info.splits['train'].num_examples / 16 ),
validation_steps = int( ds_info.splits['test'].num_examples / 16 ),
epochs=EPOCH,
validation_data=ds_test,
verbose=1,
use_multiprocessing=True,
)
aug_resnet50.compile(
loss='sparse_categorical_crossentropy',
optimizer=tf.keras.optimizers.SGD(lr=0.01),
metrics=['accuracy'],
)
history_resnet50_aug = aug_resnet50.fit(
ds_train_aug, # augmentation을 적용한 데이터셋 사용
steps_per_epoch=int( ds_info.splits['train'].num_examples/16 ),
validation_steps=int( ds_info.splits['test'].num_examples/16 ),
epochs=EPOCH,
validation_data=ds_test,
verbose=1,
use_multiprocessing=True,
)
Cutmix Augmentation
- 이미지 데이터를 자르고 섞는 방법
- 이미지를 섞는 부분과 섞은 이미지에 맞춰 라벨을 섞는 부분을 포함함.
1. 이미지 섞기
import matplotlib.pyplot as plt
for i, (image, label) in enumerate( ds_train_no_aug.take(1) ):
if i == 0:
image_a = image[0]
image_b = image[1]
label_a = label[0]
label_b = label[1]
break
plt.subplot(1,2,1)
plt.imshow(image_a)
plt.subplot(1,2,2)
plt.imshow(image_b)
plt.show()
def get_clip_box( image_a, image_b ):
image_size_x = image_a.shape[1]
image_size_y = image_a.shape[0]
x = tf.cast( tf.random.uniform([], 0, image_size_x ), tf.int32 )
y = tf.cast( tf.random.uniform([], 0, image_size_y ), tf.int32 )
width = tf.cast( image_size_x*tf.math.sqrt(1-tf.random.uniform([], 0, 1)), tf.int32 )
height = tf.cast( image_size_y*tf.math.sqrt(1-tf.random.uniform([], 0, 1)), tf.int32 )
x_min = tf.math.maximum(0, x-width//2)
y_min = tf.math.maximum(0, y-height//2)
x_max = tf.math.minimum(image_size_x, x+width//2)
y_max = tf.math.minimum(image_size_y, y+width//2)
return x_min, y_min, x_max, y_max
x_min, y_min, x_max, y_max = get_clip_box(image_a, image_b)
print('x : ', x_min, x_max)
print('y : ', y_min, y_max)
def mix_2_images( image_a, image_b, x_min, y_min, x_max, y_max ):
image_size_x = image_a.shape[1]
image_size_y = image_a.shape[0]
middle_left = image_a[y_min:y_max, 0:x_min, :] # image_b의 왼쪽 바깥 영역
middle_center = image_b[y_min:y_max, x_min:x_max, :] # image_b의 안쪽 영역
middle_right = image_a[y_min:y_max, x_max:image_size_x, :] # image_b의 오른쪽 바깥 영역
middle = tf.concat([middle_left,middle_center,middle_right], axis=1)
top = image_a[0:y_min, :, :]
bottom = image_a[y_max:image_size_y, :, :]
mixed_img = tf.concat([top, middle, bottom],axis=0)
return mixed_img
mixed_img = mix_2_images(image_a, image_b, x_min, y_min, x_max, y_max)
plt.imshow(mixed_img.numpy())
plt.show()
2. 라벨 섞기
# CutMix에서는 면적에 비례해서 라벨을 섞어줌.
# 섞인 이미지의 전체 이미지 대비 비율을 계산해서 두 가지 라벨의 비율로 더해줌.
def mix_2_labels( label_a, label_b, x_min, y_min, x_max, y_max, num_classes=120 ):
image_size_x = image_a.shape[1]
image_size_y = image_a.shape[0]
mixed_area = (x_max-x_min) * (y_max-y_min)
total_area = image_size_x * image_size_y
ratio = tf.cast( mixed_area / total_area, tf.float32 )
if len( label_a.shape )==0:
label_a = tf.one_hot( label_a, num_classes )
if len( label_b.shape )==0:
label_b = tf.one_hot( label_b, num_classes )
mixed_label = (1-ratio) * label_a + ratio*label_b
return mixed_label
mixed_label = mix_2_labels( label_a, label_b, x_min, y_min, x_max, y_max )
mixed_label
# cutmix() 함수 구현
def cutmix(image, label, prob=1.0, batch_size=16, img_size=224, num_classes=120):
mixed_imgs = []
mixed_labels = []
for i in range(batch_size):
image_a = image[i]
label_a = label[i]
j = tf.cast(tf.random.uniform([],0, batch_size),tf.int32)
image_b = image[j]
label_b = label[j]
x_min, y_min, x_max, y_max = get_clip_box(image_a, image_b)
mixed_imgs.append(mix_2_images(image_a, image_b, x_min, y_min, x_max, y_max))
mixed_labels.append(mix_2_labels(label_a, label_b, x_min, y_min, x_max, y_max))
mixed_imgs = tf.reshape(tf.stack(mixed_imgs), (batch_size, img_size, img_size, 3))
mixed_labels = tf.reshape(tf.stack(mixed_labels), (batch_size, num_classes))
return mixed_imgs, mixed_labels
Mixup Augmentation
- 두 개 이미지의 픽셀별 값을 비율에 따라 섞어주는 방식
- CutMix보다 간단하게 이미지와 라벨을 섞어줌.
def mixup_2_images( image_a, image_b, label_a, label_b ):
ratio = tf.random.uniform([], 0, 1)
if len(label_a.shape)==0:
label_a = tf.one_hot(label_a, num_classes)
if len(label_b.shape)==0:
label_b = tf.one_hot(label_b, num_classes)
mixed_image= (1-ratio)*image_a + ratio*image_b
mixed_label = (1-ratio)*label_a + ratio*label_b
return mixed_image, mixed_label
mixed_img, mixed_label = mixup_2_images(image_a, image_b, label_a, label_b)
plt.imshow(mixed_img.numpy())
plt.show()
print(mixed_label)
def mixup( image, label, prob=1.0, batch_size=16, img_size=224, num_classes=120 ):
mixed_imgs = [ ]
mixed_labels = [ ]
for i in range( batch_size ):
image_a = image[i]
label_a = label[i]
j = tf.cast(tf.random.uniform([],0,batch_size), tf.int32)
image_b = image[j]
label_b = label[j]
mixed_img, mixed_label = mixup_2_images(image_a, image_b, label_a, label_b)
mixed_imgs.append(mixed_img)
mixed_labels.append(mixed_label)
mixed_imgs = tf.reshape(tf.stack(mixed_imgs), (batch_size, img_size, img_size, 3))
mixed_labels = tf.reshape(tf.stack(mixed_labels), (batch_size, num_classes))
return mixed_imgs, mixed_labels


