
기울기 소실 (Vanishing Gradient)
- 모델이 깊어질수록 학습을 위한 Gradient가 사라지는 현상
- 활성화 함수를 변경하거나 가중치 초기화 방법을 통해서 기울기 소실 문제를 완화할 수 있음.
Skip Connection
- 레이어의 입력을 다른 곳에 이어서 Gradient가 깊은 곳까지 이어지도록 함.
- 레이어와 Skip Connection이 있는 블록을 Residual Block이라고 함.
- segmentation에서 활용되는 U-Net의 구조도 일종의 Skip connection으로 볼 수 있음.

AlexNet
- 기존에 있던 Le-Net에 CNN과 더 많은 class를 갖고 있는 네트워크
- ReLU함수, 드롭아웃, 오버래핑 풀링(Overlapping pooling) 등이 적용됨.

VGG-16
- 합성곱층 13개와 밀집층 3개로 구성됨.
- 3x3 커널을 사용해서 더 많은 레이어를 쌓고, 이미지의 비선형적 특성을 더 잘 잡아냄.

import tensorflow as tf
from tensorflow import keras
from tensorflow.keras import layers
# CIFAR100 데이터셋을 가져옴.
cifar100 = keras.datasets.cifar100
(x_train, y_train), (x_test, y_test) = cifar100.load_data()
x_train, x_test = x_train / 255.0, x_test / 255.0
print("x_train:", len(x_train), "x_test:", len(x_test))
img_input = keras.Input(shape=(32, 32, 3))
x = keras.layers.Conv2D(16, 3, activation='relu')(img_input)
x = keras.layers.MaxPool2D((2,2))(x)
x = keras.layers.Conv2D(32, 3, activation='relu')(x)
x = keras.layers.MaxPool2D((2,2))(x)
x = keras.layers.Flatten()(x)
x = keras.layers.Dense(256, activation='relu')(x)
predictions = keras.layers.Dense(100, activation='softmax')(x)
model = keras.Model( inputs=img_input, outputs=predictions )
model.summary()
# 모델 학습
model.compile(optimizer='adam',
loss='sparse_categorical_crossentropy',
metrics=['accuracy'])
model.fit(x_train, y_train, epochs=1)
# 첫 번째 블록
x = layers.Conv2D(64, (3, 3), activation='relu', padding='same', name='block1_conv1')(img_input)
x = layers.Conv2D(64, (3, 3), activation='relu', padding='same', name='block1_conv2')(x)
x = layers.MaxPooling2D((2, 2), strides=(2, 2), name='block1_pool')(x)
# 두 번째 블록
x = layers.Conv2D(128, (3, 3), activation='relu', padding='same', name='block2conv1')(x)
x = layers.Conv2D(128, (3, 3), activation='relu', padding='same', name='block2conv2')(x)
x = layers.MaxPooling2D((2, 2), strides=(2, 2), name='block2_pool')(x)
# 세 번째 블록
x = layers.Conv2D( 256, (3, 3), activation='relu', padding='same', name='block3conv1')(x)
x = layers.Conv2D( 256, (3, 3), activation='relu', padding='same', name='block3conv2')(x)
x = layers.Conv2D( 256, (3, 3), activation='relu', padding='same', name='block3conv3')(x)
x = layers.MaxPooling2D((2, 2), strides=(2, 2), name='block3pool')(x)
# 네 번째 블록
x = layers.Conv2D( 512, (3, 3), activation='relu', padding='same', name='block4conv1')(x)
x = layers.Conv2D( 512, (3, 3), activation='relu', padding='same', name='block4conv2')(x)
x = layers.Conv2D( 512, (3, 3), activation='relu', padding='same', name='block4conv3')(x)
x = layers.MaxPooling2D((2, 2), strides=(2, 2), name='block4pool')(x)
# 다섯 번째 블록
x = layers.Conv2D( 512, (3, 3), activation='relu', padding='same', name='block5conv1')(x)
x = layers.Conv2D( 512, (3, 3), activation='relu', padding='same', name='block5conv2')(x)
x = layers.Conv2D( 512, (3, 3), activation='relu', padding='same', name='block5conv3')(x)
x = layers.MaxPooling2D((2, 2), strides=(2, 2), name='block5pool')(x)
# 여섯 번째 블록
x = layers.Flatten(name='flatten')(x)
x = layers.Dense(4096, activation='relu', name='fc1')(x)
x = layers.Dense(4096, activation='relu', name='fc2')(x)
classes=100
x = layers.Dense(classes, activation='softmax', name='predictions')(x) # CIFAR100을 위한 모델
model = keras.Model(name="VGG-16", inputs=img_input, outputs=x)
model.summary()
ResNet-50
- conv_block과 identity_block을 잘 활용하여, 50개의 레이어 구조를 간결하게 표현함.
- feature의 크기가 서로 다른 4개의 Stage로 구분됨. (하나의 Stage안에서 kernel 사이즈와 channel 수는 동일)
- Skip Connection 구조를 사용해서 기울기 소실 문제를 해결함.

from tensorflow.keras import backend, regularizers, initializers, models
# block 안에 반복적으로 활용되는 L2 regularizer를 선언해줌.
def _gen_l2_regularizer( use_l2_regularizer=True, l2_weight_decay=1e-4 ):
return regularizers.l2(l2_weight_decay) if use_l2_regularizer else None
def conv_block(input_tensor,
kernel_size,
filters,
stage,
block,
strides=(2, 2),
use_l2_regularizer=True,
batch_norm_decay=0.9,
batch_norm_epsilon=1e-5):
filters1, filters2, filters3 = filters
if backend.image_data_format() == 'channels_last':
bn_axis = 3
else:
bn_axis = 1
conv_name_base = 'res' + str(stage) + block + '_branch'
bn_name_base = 'bn' + str(stage) + block + '_branch'
x = layers.Conv2D(
filters1, (1, 1),
use_bias=False,
kernel_initializer='he_normal',
kernel_regularizer=_gen_l2_regularizer(use_l2_regularizer),
name=conv_name_base + '2a') (input_tensor)
x = layers.BatchNormalization(
axis=bn_axis,
momentum=batch_norm_decay,
epsilon=batch_norm_epsilon,
name=bn_name_base + '2a')(x)
x = layers.Activation('relu')(x)
def identity_block(input_tensor,
kernel_size,
filters,
stage,
block,
use_l2_regularizer=True,
batch_norm_decay=0.9,
batch_norm_epsilon=1e-5):
def resnet50(num_classes,
batch_size=None,
use_l2_regularizer=True,
rescale_inputs=False,
batch_norm_decay=0.9,
batch_norm_epsilon=1e-5):
input_shape = (32, 32, 3) # CIFAR100을 위한 input_shape 조정입니다.
img_input = layers.Input(shape=input_shape, batch_size=batch_size)
if rescale_inputs:
x = layers.Lambda(
lambda x: x * 255.0 - backend.constant(
imagenet_preprocessing.CHANNEL_MEANS,
shape=[1, 1, 3],
dtype=x.dtype),
name='rescale')(img_input)
else:
x = img_input
if backend.image_data_format() == 'channels_first':
x = layers.Permute((3, 1, 2))(x)
bn_axis = 1
else:
bn_axis = 3
block_config = dict(
use_l2_regularizer=use_l2_regularizer,
batch_norm_decay=batch_norm_decay,
batch_norm_epsilon=batch_norm_epsilon)
x = layers.ZeroPadding2D(padding=(3, 3), name='conv1_pad')(x)
x = conv_block(x, 3, [64, 64, 256], stage=2, block='a', strides=(1, 1), **block_config)
x = identity_block(x, 3, [64, 64, 256], stage=2, block='b', **block_config)
x = identity_block(x, 3, [64, 64, 256], stage=2, block='c', **block_config)
x = layers.GlobalAveragePooling2D()(x)
x = layers.Dense(num_classes,
kernel_initializer=initializers.RandomNormal(stddev=0.01),
kernel_regularizer=_gen_l2_regularizer(use_l2_regularizer),
bias_regularizer=_gen_l2_regularizer(use_l2_regularizer),
name='fc1000')(x)
x = layers.Activation('softmax', dtype='float32')(x)
return models.Model(img_input, x, name='resnet50')
model = resnet50(num_classes=100)
model.summary()
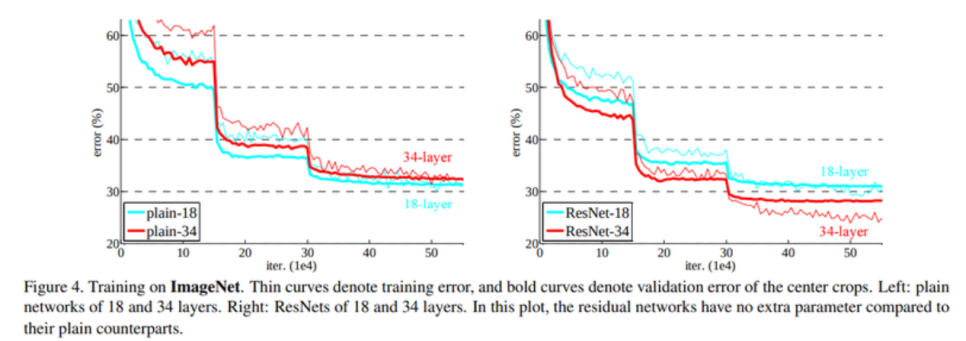
Degradation Problem
- 딥러닝 모델의 레이어가 깊어졌을 때 모델이 수렴했음에도 불구하고, 오히려 레이어 개수가 적을 때보다 모델의 training error 및 test error가 더 커지는 문제
- 오버피팅 때문이 아니라, 네트워크 구조상 레이어를 깊이 쌓았을 때 최적화가 잘 안되기 때문에 발생하는 문제
- ResNet 논문에서 이 문제를 해결하기 위한 Residual Block이라는 솔루션을 제시함.

Res-Net
- 깊은 네트워크의 학습이 어려운 점을 해결하기 위해 레이어의 입력값 x를 활용함.
- 입력값 x를 identity mapping으로 감싸서 정보가 손실되지 않게 출력값으로 전달함.
- 학습해야할 레이어 H(x)를 F(x) + x로 만들면 아무리 F(x)가 zero mapping이 될지라도, 최종 H(x)는 identity mapping이라도 되므로 성능 저하가 발생하지 않게 됨.
- 실제로 학습해야 할 F(x)는 학습해야 할 레이어인 H(x)에다 입력값 x를 뺀 형태인 Residual function이 됨.
- 일종의 지름길인 shortcut connection을 통해서 레이어가 입력값을 직접 참조하도록 레이어를 변경함.
- Shortcut connection은 앞에서 입력으로 들어온 값을 네트워크의 출력층에 곧바로 더해줌.
- shortcut connection을 가진 기본 블록을 Residual Block이라고 함.
- shortcut이 적용된 레이어는 깊어져도 학습이 잘 되는 효과를 볼 수 있음.

Dense-Net (Densely Connected Convolutional Networks)
- Res-Net의 shortcut connection을 마치 Fully Connected Layer처럼 촘촘하게 하여 성능을 더욱 개선함.
- L개의 레이어가 있을 때 레이어 간에 L(L+1) / 2개의 직접적인 연결인 dense connectivity를 만듦.
- dense connectivity를 Hl로 표기하고, 이를 합성 함수(composite function)라고 부름.
- 각 레이어는 이전 레이어들에서 나온 특성맵 전부를 입력값으로 받음.
- 특성맵들을 채널 축을 따라 연결(concatenate)하여 하나의 텐서로 만듦.
- Hl은 이 텐서에 대해 배치 정규화, ReLU 활성화 함수, 3x3 컨볼루션 레이어를 통해서 pre-activation을 수행함.
- 특성 맵을 채널 방향으로 쌓아서 사용함.
- growth rate라는 값을 조정하여 채널의 개수를 조절함.


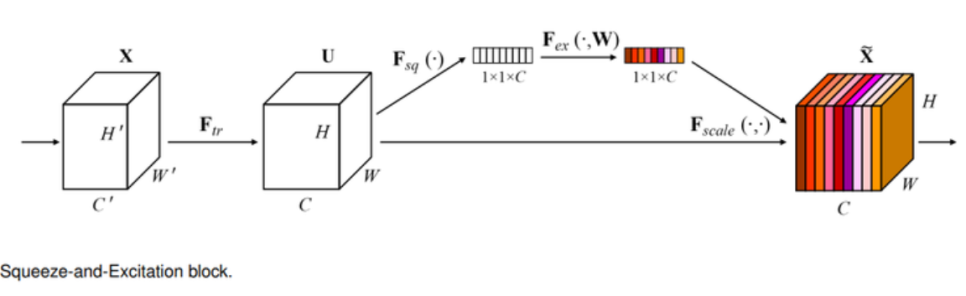
SE-Net (Squeeze-and-Excitation Networks)
- Squeeze는 특성에서 중요한 정보를 짜내는 과정임.
- 채널 방향으로 Global Average Pooling(GAP)을 적용하여 중요한 채널이 활성화되도록 함.
- CNN에서 나온 특성 맵의 채널에 어텐션(attention) 매커니즘을 적용한 블록을 만들어냄.
- Ftr이라는 컨볼루션 레이어를 거치면 'H x W x C'의 크기를 가진 특성 맵 U 가 나옴.
- Fsq함수에서 Squeeze가 일어나며, 특성맵은 '1 x 1 x C'의 크기로 변함.
- 얻어진 '1 x 1 x C'의 벡터는 채널별 정보를 압축해 담고 있음.
- Excitate는 채널별 정보에 따라 어떤 채널을 강조해야 할지 판단하는 과정임.
- 여러 채널들이 서로 다른 정도로 활성화되도록 하기 위해 시그모이드를 사용함.


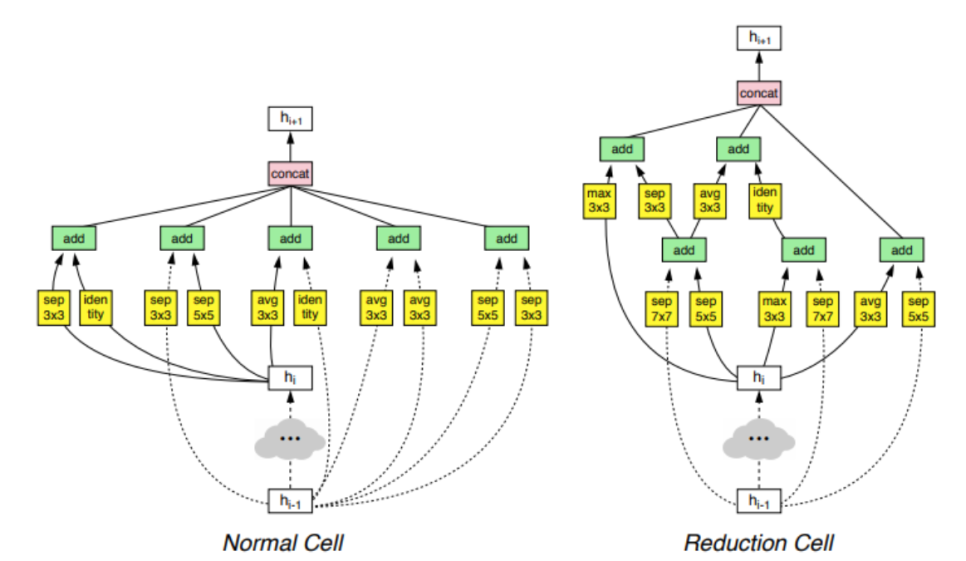
NAS-Net
- NAS (neural architecture search): 신경망을 사용해 최적화된 모델의 구조를 탐색하는 접근 방법
- 딥러닝에서 모델을 탐색하기 위해 강화학습 모델이 하이퍼파라미터를 조정하면서 최적의 성능을 내도록 함.
- 레이어의 세부 구성, CNN의 필터 크기, 채널의 개수, connection 등이 조정할 수 있는 변수가 됨.
- 네트워크 구성에 대한 요소들을 조합할 수 있는 범위를 탐색 공간(search space)라고 함.
- 탐색 공간을 줄이기 위해 모듈(cell) 단위의 최적화를 하고, 그 모듈을 조합하는 방식을 채택함.
- Convolution cell은 normal cell과 reduction cell로 구분됨.
- normal cell은 특성 맵의 가로, 세로가 유지되도록 stride를 1로 고정함.
- reduction cell은 stride를 1 또는 2로 가져가서 특성 맵의 크기가 줄어들도록 함.
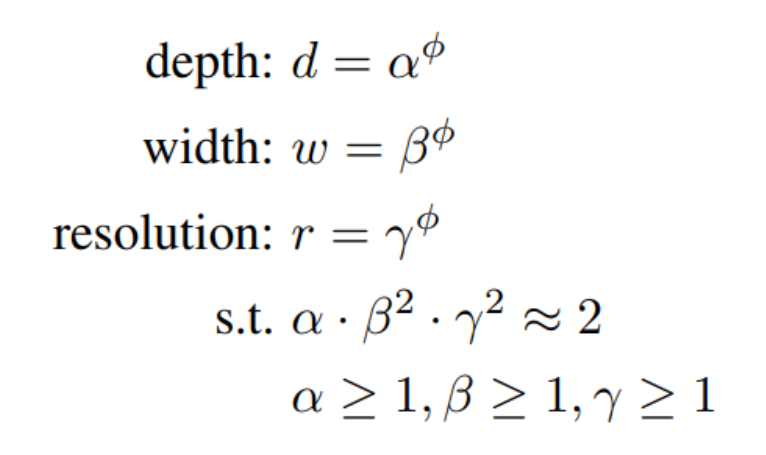
Efficient-Net
- CNN을 효율적으로 사용할 수 있도록 네트워크의 형태를 조정할 수 있는 width, depth, resolution이라는 세 가지 scaling factor에 집중함.
* width: CNN의 채널 (채널을 늘려줄수록 CNN의 파라미터와 특성을 표현하는 차원의 크기를 키울 수 있음.)
* depth: 네트워크의 깊이
* resolution: 입력값의 너비(w)와 높이(h)
- width, depth, resolution를 동시에 고려하는 compound scaling을 제안함.
- compound coefficient ϕ는 모델의 크기를 조정하기 위한 계수임.
- ϕ를 고정시키면 보다 일정한 규칙에 따라 모델의 구조가 조절됨.
VGG (Visual Geometry Group)
- 심층 합성곱 신경망 아키텍처
- 이미지 분류(classification) 및 인식(recognition)을 위해 개발됨.
- 모든 컨볼루션 레이어와 맥스풀링 레이어에 작은 3x3 필터가 있음.
- 객체 감지(object detection), 세분화(segmentation), 자연어 처리와 같은 다양한 애플리케이션에서 다
른 딥러닝 모델의 빌딩 블록으로 사용됨.

# CIFAR-10 데이터셋 준비하기
import tensorflow as tf
from tensorflow import keras
import tensorflow_datasets as tfds
import urllib3
(ds_train, ds_test), ds_info = tfds.load(
'cifar10',
split = ['train', 'test'],
shuffle_files = True,
with_info = True,
)
def normalize_and_resize_img( image, label ):
return tf.cast( image, tf.float32 ) / 255., label
def apply_normalize_on_dataset( ds, is_test = False, batch_size = 16 ):
ds = ds.map(
normalize_and_resize_img,
num_parallel_calls = 1
)
ds = ds.batch( batch_size )
if not is_test:
ds = ds.repeat()
ds = ds.shuffle(200)
ds = ds.prefetch( tf.data.experimental.AUTOTUNE )
return ds
fig = tfds.show_examples(ds_train, ds_info)
fig = tfds.show_examples(ds_test, ds_info)
# 블록 구성하기
def build_vgg_block( input_layer,
num_cnn = 3,
channel = 64,
block_num = 1,
)
# 입력 레이어
x = input_layer
# CNN 레이어
for cnn_num in range( num_cnn ):
x = keras.layers.Conv2D(
filters = channel,
kernel_size = (3,3),
activation = 'relu',
kernel_initializer = 'he_normal',
padding = 'same',
name = f'block{ block_num }_conv{ cnn_num }'
)(x)
# Max Pooling 레이어
x = keras.layers.MaxPooling2D(
pool_size=(2, 2),
strides=2,
name=f'block{block_num}_pooling'
)(x)
return x
vgg_input_layer = keras.layers.Input( shape=(32,32,3) ) # 입력 레이어 생성
vgg_block_output = build_vgg_block( vgg_input_layer ) # VGG 블록 생성
# 블록 1개짜리 모델 생성
model = keras.Model( inputs = vgg_input_layer, outputs = vgg_block_output )
model.summary()
# VGG-16
def build_vgg( input_shape = (32,32,3),
num_cnn_list = [2,2,3,3,3],
channel_list = [64,128,256,512,512],
num_classes = 10)
# 모델을 만들기 전에 config list들이 같은 길이인지 확인함.
assert len( num_cnn_list ) == len( channel_list )
input_layer = keras.layers.Input( shape=input_shape ) # input layer를 만들어둡니다.
output = input_layer
# config list들의 길이만큼 반복해서 블록을 생성함.
for i, (num_cnn, channel) in enumerate( zip( num_cnn_list, channel_list ) ):
output = build_vgg_block(
output,
num_cnn = num_cnn,
channel = channel,
block_num = i
)
output = keras.layers.Flatten(name='flatten')(output)
output = keras.layers.Dense(4096, activation='relu', name='fc1')(output)
output = keras.layers.Dense(4096, activation='relu', name='fc2')(output)
output = keras.layers.Dense(num_classes, activation='softmax', name='predictions')(output)
model = keras.Model(
inputs = input_layer,
outputs = output
)
return model
vgg_16 = build_vgg()
vgg_19 = build_vgg(
num_cnn_list = [2,2,4,4,4],
channel_list=[64,128,256,512,512]
)
BATCH_SIZE = 256
EPOCH = 15
(ds_train, ds_test), ds_info = tfds.load(
'cifar10',
split=['train', 'test'],
as_supervised=True,
shuffle_files=True,
with_info=True,
)
ds_train = apply_normalize_on_dataset( ds_train, batch_size = BATCH_SIZE )
ds_test = apply_normalize_on_dataset( ds_test, batch_size = BATCH_SIZE )
vgg_16.compile(
loss='sparse_categorical_crossentropy',
optimizer=tf.keras.optimizers.SGD( lr=0.01, clipnorm=1. ),
metrics=['accuracy'],
)
history_16 = vgg_16.fit(
ds_train,
steps_per_epoch = int( ds_info.splits['train'].num_examples / BATCH_SIZE ),
validation_steps = int( ds_info.splits['test'].num_examples / BATCH_SIZE ),
epochs = EPOCH,
validation_data = ds_test,
verbose = 1,
use_multiprocessing = True,
)
vgg_19.compile(
loss = 'sparse_categorical_crossentropy',
optimizer = tf.keras.optimizers.SGD( lr=0.01, clipnorm=1. ),
metrics=['accuracy'],
)
history_19 = vgg_19.fit(
ds_train,
steps_per_epoch=int( ds_info.splits['train'].num_examples/BATCH_SIZE ),
validation_steps=int( ds_info.splits['test'].num_examples/BATCH_SIZE ),
epochs=EPOCH,
validation_data=ds_test,
verbose=1,
use_multiprocessing=True,
)


